
Lethal Company: Beginners Guide & Tips
Lethal Company is a co-op survival extraction game with a bit of horror mixed into it. You are a contracted worker for The Company (Yes, that’s the company name). You have a few days to collect scrap from abandoned moons to meet the Company's profit quota, failure to do so will result in you and your party being fired from the Company.
The game can be pretty difficult in the beginning as you basically go in without that much info on what to do and everything. The game was released in early access on 24th October, 2023 and it still has a long way to go before the full release. I will be compiling a guide to help you out with the basics of the game and how to plan properly for the missions.
Note: The game has changed a lot since its release with each update adding new items and changing how the existing game works, I tend to keep the guide up-to-date after each update however, some of the strategies or tips listed in the guide may not be accurate or do not work anymore.
Other Articles:
Lethal Company Controls
Update: As of Version 45, you can rebind the controls by going to the “Change Keybinds” option in the Settings menu under the Sensitivity settings. The game also added an “Arachnophobia Mode” in the accessibility option.
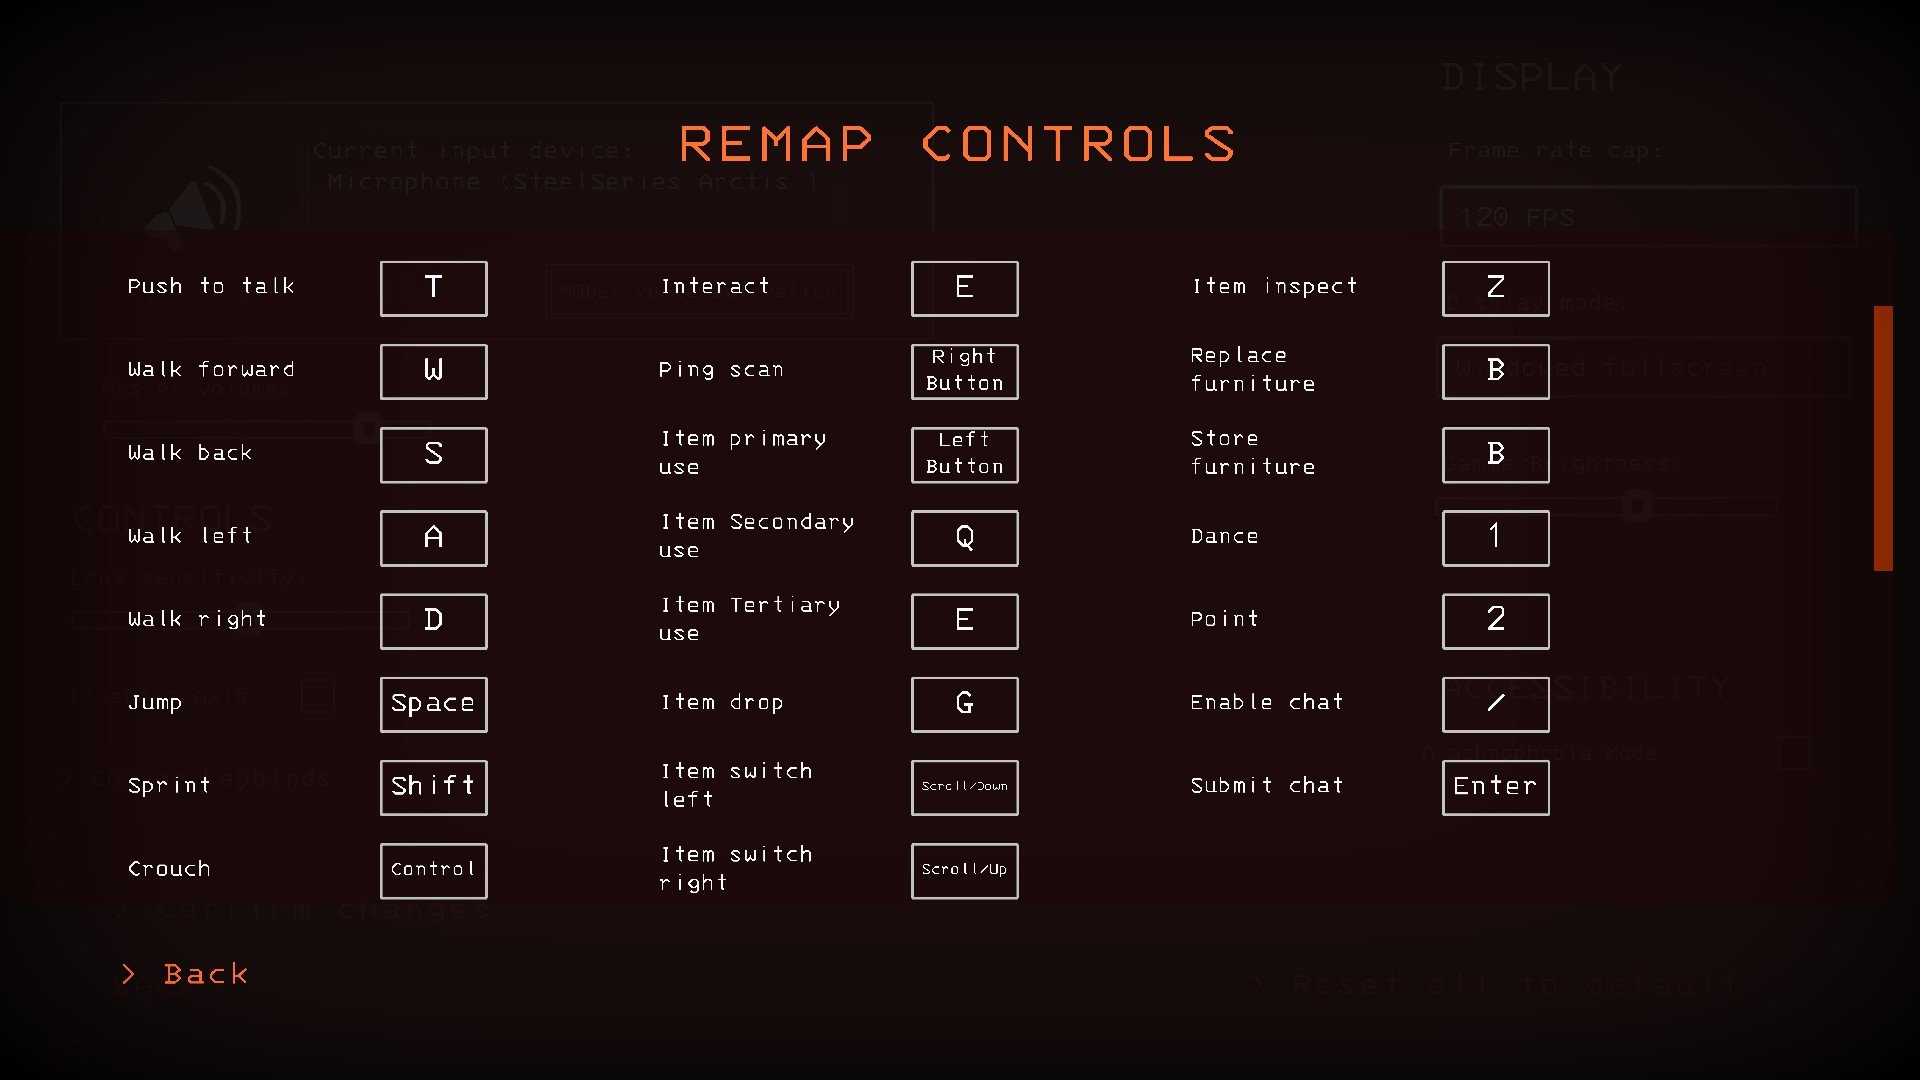
Currently as the game is in Early Access, there is no option to rebind the controls apart from the push to talk key. Until we have an option to rebind controls the only way to change the controls is probably binding the key to another key or mouse button using your peripheral software.
The game usually shows some of the controls when holding an item however there are still some controls that are not mentioned anywhere.
The current control scheme for Lethal Company is the following:
| Key | Command |
| W, S, A, D | Movement |
| T | Default Push-to-Talk Key |
| Left Shift | Sprint |
| Space | Jump |
| Left Control | Crouch |
| RMB | Scan |
| LMB | Use equipped item |
| Scroll Wheel | Scroll between inventory items |
| G | Drop equipped item |
| 1 | Emote - Dance |
| 2 | Emote - Point |
| E | Interact |
| B | Move furniture in ship |
| X | Store item in storage (While moving furniture) |
| R | Rotate furniture |
| Shift+H | Console/Developer Log? |
| Q / E | Flip page (Clipboard) |
| Z | Zoom in (Clipboard) |
Weather Effects
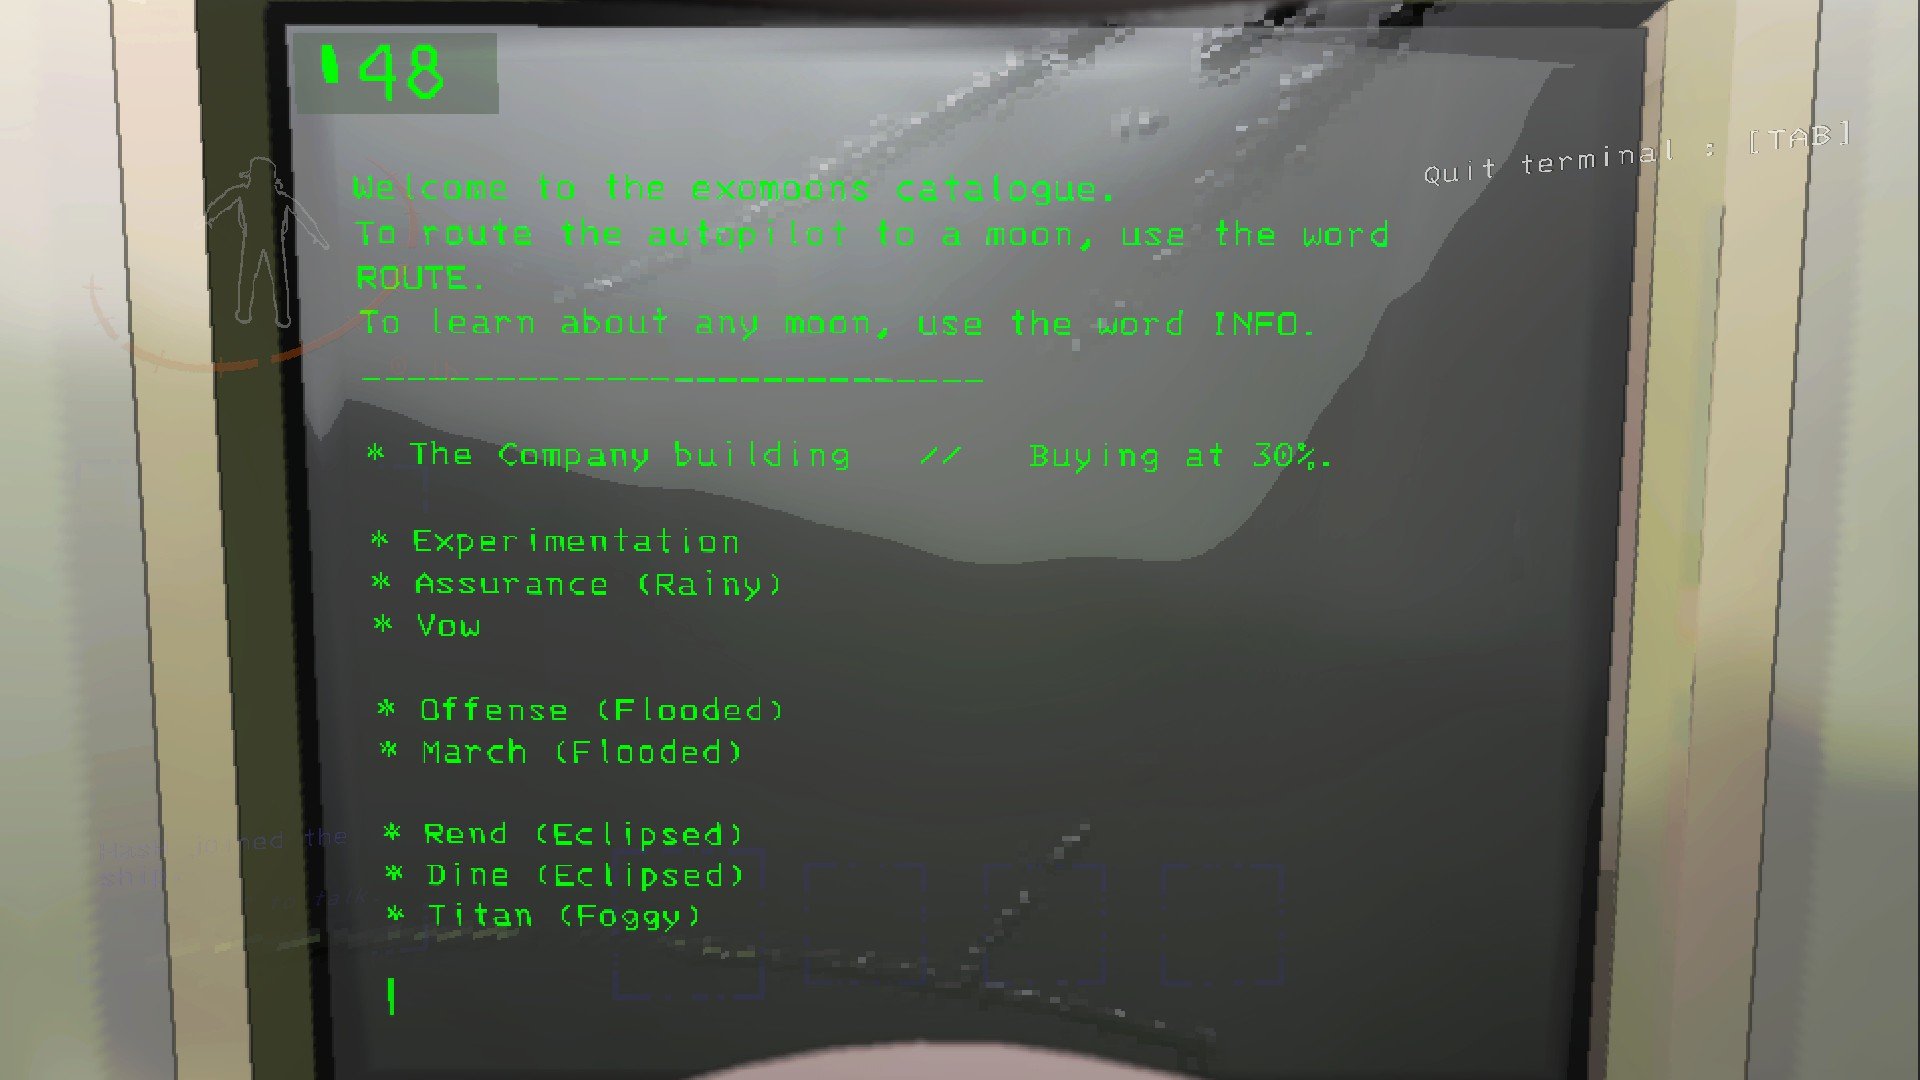
Whenever you’re selecting a new moon to travel to, you’ll find out that some of the planets may have a weather effect. Each weather effect changes how you approach the moon and can make the game more difficult. As of now, weather effects does not have any effect on the value of the loot that you will find so it is recommended to avoid going to any moon with weather effects as it will just increase your chances of not surviving. Here are all the current weather effects present in the game.
Rainy
Storming
Flooded
Eclipsed
Foggy
Not all the weathers are available on each moon and some weather effects may be more common on some moons as they only have a couple of weather effects available which in turn increases the chances of them having a weather effect.
You can see the weather effects that can affect a moon below:
| Experimentation | Assurance | Vow | Offense | March | Adamance | Rend | Dine | Titan | Embrion | Artifice | |
| Rainy | Yes | Yes | No | Yes | No | Yes | No | No | No | No | Yes |
| Stormy | Yes | Yes | Yes | Yes | Yes | Yes | Yes | No | Yes | No | Yes |
| Flooded | Yes | Yes | Yes | Yes | Yes | Yes | No | Yes | No | No | Yes |
| Foggy | Yes | Yes | Yes | No | Yes | Yes | No | No | Yes | Yes | No |
| Eclipsed | Yes | Yes | Yes | Yes | Yes | Yes | Yes | Yes | Yes | Yes | Yes |
Rainy
Rain on the moon will introduce quicksand and mud holes to the map. This means that you need to be mindful of what route you take. If you step into these hazards then you need to quickly make it back out before you drown. Make sure to always have stamina when exploring outside and if you feel your movement slowing down and hearing slushing noises then turn back around and sprint out of it, you can try jumping but it will consume more stamina.
Storming
A thunderstorm is present on the moon which would mean constant rain with frequent thunder strikes. The thunder strikes can strike anything metallic and will kill anything in its radius. A visual indication of a thunder strike would be static building up on the object before a thunderbolt hits it. It can hit an object that’s on the map, a loot that you have or your gear. It is advised that you take caution in what items that you’re carrying and what loot you’re bringing back to the ship.
It can strike on an metallic object that’s in your inventory and not just what you’re holding so if you have a key or tea kettle in your inventory but you’re not holding you are still not safe from the lightning. It can also hit your ship which will cause it to lose power temporarily, you would need to turn on the lights and radar back on again.
Flooded
Constant rain on the moon means that the water has started to flood the planet, there would be many pools of water on the planet that would make it hard to navigate. Remember that you can not swim so make sure to not drown. When traversing the water you will drain stamina and can not recover stamina until you are out of the water. Try to move around the edges of the water or travel around by climbing hills if available, an extension ladder can also help in traversing the pools.
The water levels may also increase as time goes on so it’s better to leave as early as possible as in the night it may become harder to spot the water pools and more areas may be flooded due to the rising water levels.
Eclipsed
An eclipse on the moon means that there’s permanent night time on the map. This means that all the monsters can spawn right as the game starts. I have even seen a pack of blind dogs roaming right outside where the ship lands. It is best advised to just avoid eclipsed moons as it is pretty much the hardest weather effect to play in.
Foggy
A thick fog would make is pretty much impossible to navigate on the map. Unless you know the map really well you can get lost pretty easily in this weather. The amount of fog varies and it could be light or heavy fog, you will only know how foggy it is once you land.
Despite the fog this will not affect the vision of some creatures like the Forest Giant which would still be able to see you so it is best advised to not pick a moon where they might spawn as it will be much harder to hide from them in the fog.
Moons
The current game has 11 moons that you can travel to, 13 if you include The Company moon and the hidden Liquidation moon that was found in the game files.
Each moon has a different layout and the chances of each creature spawning vary for each moon. The moons are broken up in different tiers in terms of difficulty. Here are the 11 moons that you can travel to:
Tier 1 Moons:
Experimentation
Assurance
Vow
Tier 2 Moons:
Offense
March
Adamance
Tier 3 Moons:
Rend (Cost: 550)
Dine (Cost: 600)
Titan (Cost: 700)
Secret Moons:
Embrion (Cost: 150)
Artifice (Cost: 1500)
You can read more about each moon, their layout and which creatures can spawn on each moon in the other guide that I have regarding it.
Read More: Lethal Company: Moons Guide & Layout
Team Strategy
Even though the game can be played solo or with a duo partner. The game is probably much easier when playing with 3 to 4 players as it makes sure that you can assign roles to each member ensuring maximum efficiency. Remember that at least 2 walkie-talkies are required so the person in the ship can communicate to someone regarding any potential threats and unlocking any secured doors etc.
If you’re playing solo then there are obviously no roles as you would have to do everything yourself without any guidance via the ship terminal. However if you are playing with other people then you can assign roles as following:
2 players
In the start, both can quickly run to the facility and try to take any scrap that they can find in the early hours of the day. Afterwards, you can co-operate as the following:
Person A can initially go for a quick run at the start of the day and bring in any close-by loot. Otherwise, they can stay inside the ship and keep an eye on the radar and use the terminal to provide navigation, opens doors, inform of any enemies, order items and more.
Person B goes around to scavenge items and brings them back to the ship.
3-4 Players
If you have 3 or 4 players then you can have a much more organized party. In the start when there aren’t many enemies on the map, everyone can go inside and try to gather loot as quickly as possible and bring all the loot outside. Afterwards, they can split up into different roles in order to explore the deeper parts of the facility safely.
Person A stays inside and provides navigation via the radar, opens doors, keep track of time etc. They can also order any items that may be required for the team and keep track of everyone’s status. You can let them know regarding any nearby creatures and scrap and where it is. You can also use the terminal to trap creatures behind secured doors.
Person B communicates with Person A using the walkie-talkie and lets the other know where to go and about any dangers that he learns about. He can keep any equipment to help the team out with such as stun grenades, zap gun or flashlights.
Person C goes around to scavenge items and brings them back outside of the fire exit or main entrance. Remember to always leave them outside the building for them so others can carry the loot safely without it being stolen.
Person D can run the scrap from the entrances to the ship and help others with any other tasks as well like helping the scavenging team or the person on the ship to scout for any monsters outside as the eyeless dog can actually come inside the ship. They can also go in to help the others that may require help with carrying extra loot or to help guide them if they are lost deep inside the facility.
Obviously if you are playing with 3 people then remove person D and either person B or C can just bring all the loot back to the ship. Also, person B doesn’t need to be the voice for the whole team going inside if you have enough cash from selling scrap you can get multiple walkie-talkies and provide everyone with a walkie-talkie so they can effectively communicate without having to rely on one person for information. Just make sure to keep the communications clean so that the radar doesn’t get overloaded with unnecessary information.
In my group of 4 people, we rotate on who gets to stay in the ship. In the first few days we just have a couple of flashlights and everyone goes in to scavenge loot, once we have met the first quota we get flashlights and walkie-talkies for everyone and the person inside the ship switches between everyone. We would have one person go scavenge solo and the other two players stick around, we would also take different entrances if possible to clear the level much quicker.
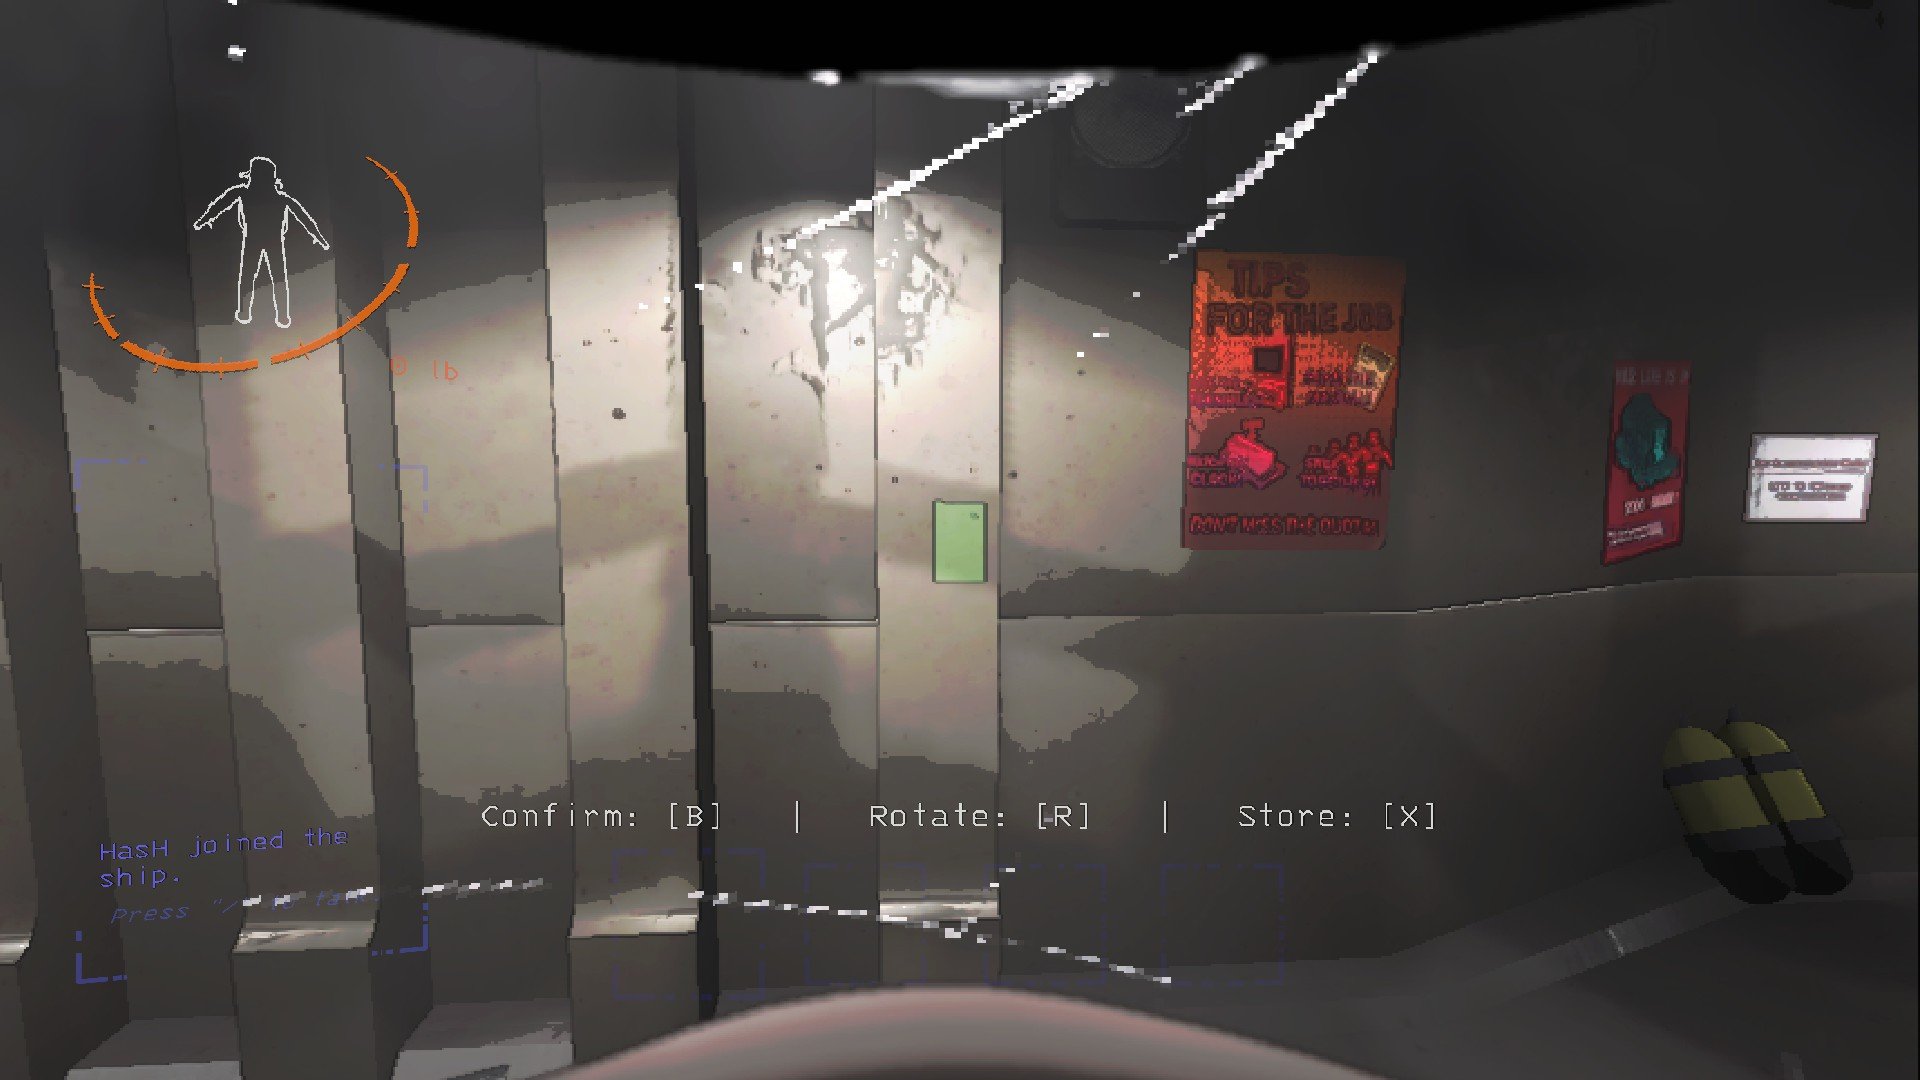
You can renovate your ship by moving the furniture to make it much more accessible and lively.
Ship
The ship is basically your command center from where you can order equipment for the team, learn about any monsters that you have scanned, check up on the rest of the crew all from the terminal found in the ship.
You can also change the layout of the equipment in the ship by pressing B. I would suggest storing some of the props that do not have a purpose right now in the game to the storage by pressing X when you have selected the equipment after pressing B. The selected equipment can be rotated as well.
I would suggest moving things so they are close to each other. Keep the terminal close to the radar and launch control. You can move the light switch close to the radar and terminal in a position where there is lighting to make it easier to find such as the radar.
The take off lever, cameras, door buttons, battery charger, clothes line and the random air tank – all of these items cannot be moved so it’s important to take into consideration where they are located to help you with when changing the layout of the ship.
Ship Upgrades
Loud Horn
Cost - 100
A loud signal horn that can be heard outside and all throughout the facility. Just pull the lever to sound the horn; click for a short blast, hold for a prolonged blast. This may sound like a dumb idea as it will attract creatures like eyeless dogs however, the horn is located in the front of the ship. If your team is stuck when coming back or the door of the ship is being camped by the dogs then it can help in moving them out of the way to help your team get in safely so you can escape.
Teleporter
Cost - 375
A teleportation device to teleport your teammates back to the ship. In order to teleport a player you need to select them on the radar and then press the button after lifting the glass cover. It takes a couple of seconds before the player is teleported. Keep in mind that this will drop their inventory so only do it in dire situation like if they’re stuck, there’s no time to make it back to the ship or they are close to death.
You can actually start the teleport before they are about to die to save them. I have been saved from the forest giant as the teleport started right before I was grabbed and I got teleported to the ship while I was grabbed. You can also teleport any corpses of your team for the extra credits (There is no corpse to recover if they are eaten by the worm).
Inverse Teleporter
Cost - 425
Similar to the teleporter however, it teleports you to a random location inside the facility. The teleportation would cause you to drop the items when using the inverse teleporter, meaning that you would be teleported inside without any items to help you with. In order to use the inverse teleporter just stand near it and it will randomly teleport you. It can teleport multiple people if they all stand next to it however, they will all be teleported to random locations individually and not to a single location.
Keep in mind that the inverse teleporter can sometimes teleport you in unreachable places such as behind a locked door or on top of an object causing you to get stuck. Having the normal teleporter as well alongside this can help in making sure that you can just teleport the player back to the ship if they are teleported to an awkward spot. Also, there are rumors that placing the new radar booster can help in being able to inverse teleport near to the booster.
Signal Translator
Cost - 255
The signal translator allows you to transmit text messages globally, in order to use the translator you would need to type "transmit” followed by the message in the terminal to send it to everyone in the game. The signal translator only allows messages up to 10 words at the moment. It is obviously only helpful if you are playing with people without voice communication or they just don’t have a walkie-talkie. You can also use it to transmit message if you hear eyeless dogs outside and do not want to attract them to the ship.

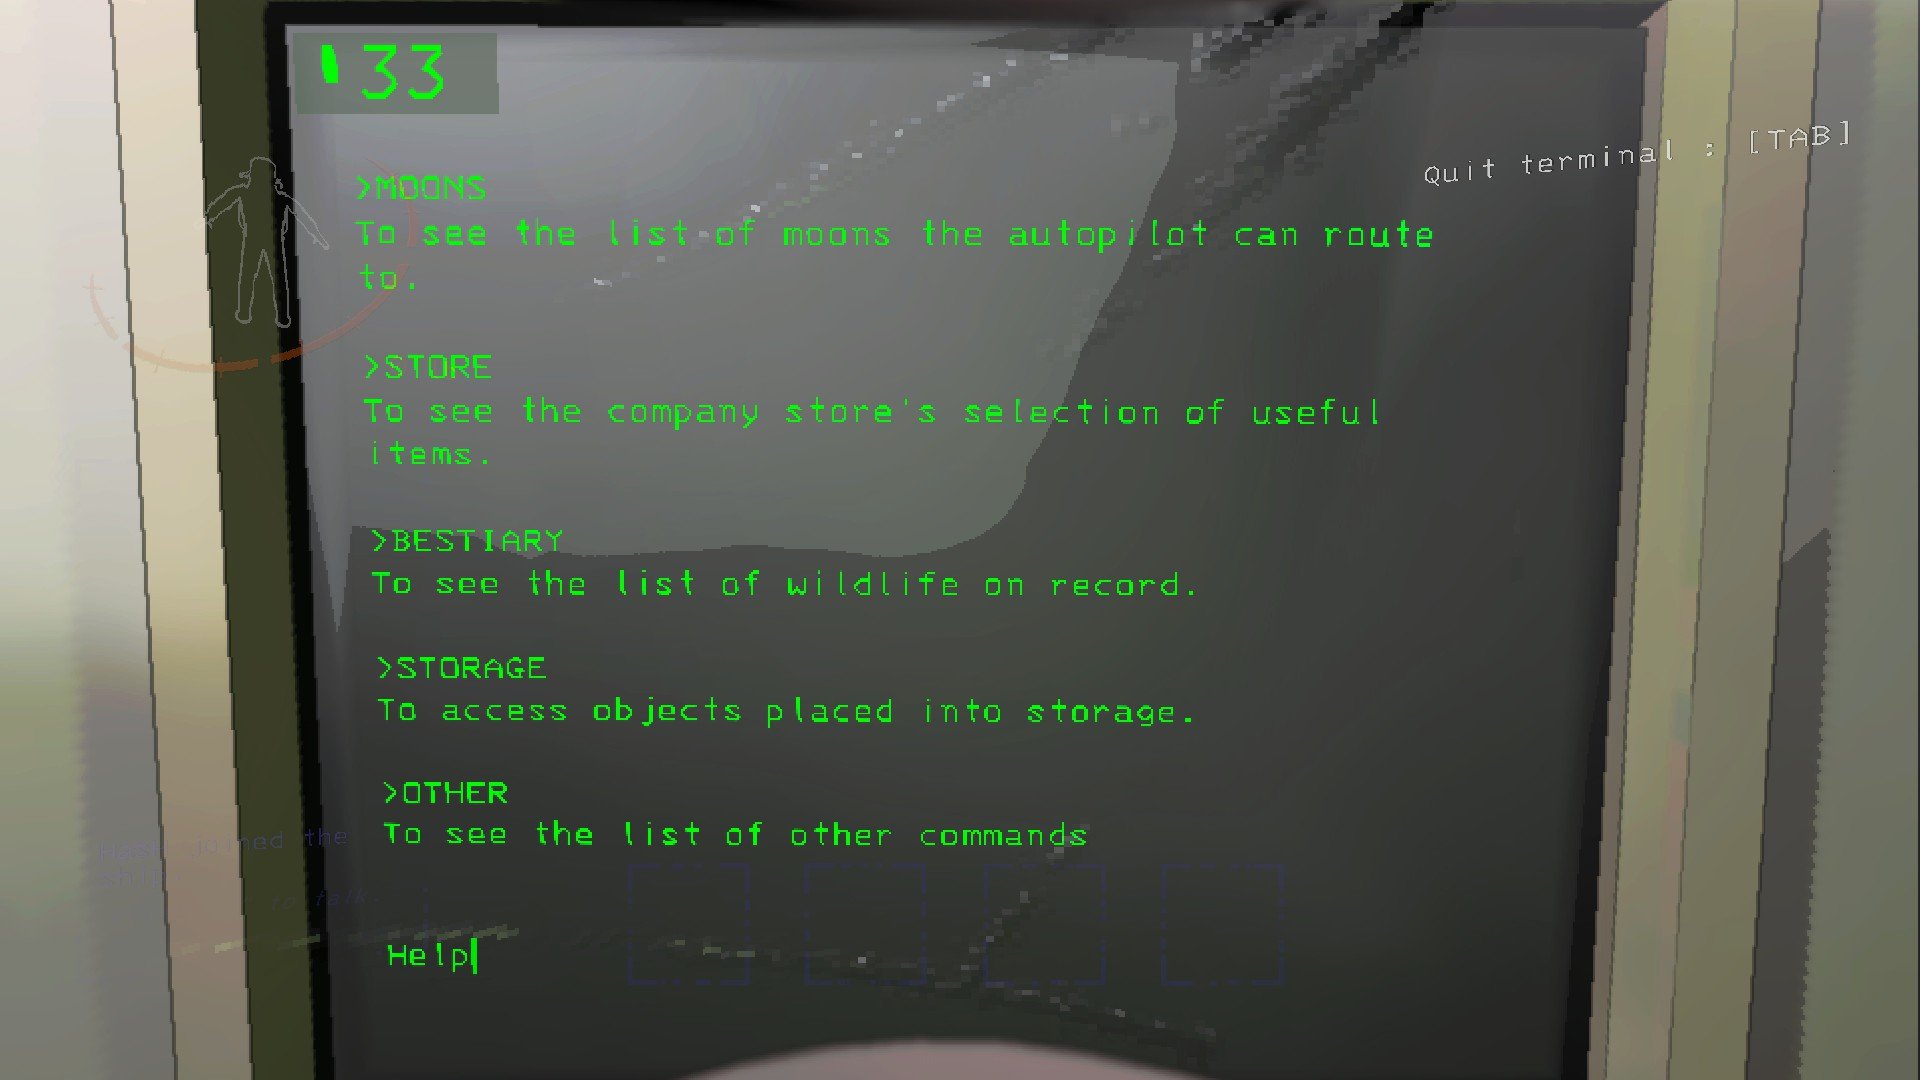
Terminal
The terminal is where you can control most of the things going on in the game; from traveling to different moons, ordering items from the store, opening any locked doors or disarming traps and more.
When you purchase items it will arrive via a drop pod and even though it has 4 vents where it drops items you can have a maximum of 12 items that can arrive at a time. You can order different types of items if you purchase them in quick succession before the drop pod arrives.
Some of the basic commands that you will find when you enter the terminal are:
Help - Opens the start up screen showing all the available commands.
Moons - Shows the list of all the moons that you can visit
Store - Opens the store with all the items available.
Bestiary - All recorded creatures can be seen and read about in the Bestiary.
Storage - Any furniture items that you may store from the ship can be accessed from the storage.
Other - Contains other commands such as the radar, scan and switching players in radar. You do not have to access Other to use the commands under it.
Transmit - Transmits a message to everyone on their screen if you have a Signal Transmitter.
Sigurd - Read all the logs that you find scattered across the moons.
Here are some tips regarding the terminal:
The terminal or your command center.
Radar
Apart from the radar being on the launch control station, you can also bring up the radar on your terminal screen to make it easy to help your team without having to constantly switch back and forth from the terminal and the radar. You can view the radar on the terminal by typing “view monitor” in order to have the radar as an overlay on the terminal, you can switch between users by typing “switch”. You can also switch to a specific player if you type their name after switch (If a name is too long then you can just type the first few characters). While on the terminal you can still talk to the players by holding Left Click if you have the walkie-talkie equipped.
Here are some of the color indicators that are shown on the radar:
Blue - Player
Green - Place of Interest.
Yellow - Scrap / Loot
Red - Threat (Bigger blob = larger monster)
Security Door - The two character coded ID is displayed on screen. Type the ID to toggle it open or close. Two tiny yellow pips indicates gate position.
Red Rectangle with cone - Turret Icon, Cone & ID. The cone references its current scanning direction. The turret can still scan and shoot enemies that are in front of it despite being out of the scanning cone. The two character coded ID is displayed on screen. Type the ID to disable the turret for 5 seconds.
Small Dark Red circle - A Mine Pip & ID - The mine has a two character coded ID that is displayed on screen. Type the ID to disable the mine for 5 seconds so that the teammate can step off it.
Huge, Thick Cyan line - Main Entrance
Long, Thin Cyan line - Fire Exit
Yellow Circle With Lightning Sign = Power Switch Box
Small Cyan line - Door
Small Cyan line with dots - Locked door
Small Red line - Vents
Smaller Red line in hallways - Spider Webs
Arrow at Bottom-right - When outside, there’s a green arrow that points towards the direction of the ship.
A green code on the radar means a door is opened, turret is on, or landmine is armed. You can see the code for any locked secure door on the top right of the door usually, co-ordinate with the terminal operator back at the ship so that they can unlock/lock the doors and inform you of any nearby monsters.
You can not interact with the secured doors if there is no power, usually you can find the switch box on the map which controls the lightning on most sections of the map. There would be around 5 switches and they are on when facing to the left. Make sure to flip any breakers that are off by default to be able to interact with all the doors on the map. Taking the power apparatus shuts down the whole facility and all the doors would remain open which gives another reason to take that item last.
Terminal Shortcuts
One thing to know is that apart from the starting commands such as store, moons etc. Most of the other commands can be shortened so you don’t have to type the whole thing as long as the prompt you have written can auto-complete to a single result. You can also confirm and deny an option by just typing C or D as well.
Here are some aliases for the commands:
Moon/Routing Commands
EXPERIMENTATION accepts EXP
ASSURANCE accepts ASS
VOW accepts VOW
OFFENCE accepts OFF
MARCH accepts MAR
REND accepts REN
DINE accepts DIN
TITAN accepts TIT
For info on a moon, your only need to type INF MOON -NAME or MOON-NAME INF, both are accepted by the terminal.
Store Commands
WALKIE-TALKIE accepts WAL
FLASHLIGHT accepts FLA
SHOVEL accepts SHO
LOCKPICKER accepts LOC
PRO-FLASHLIGHT accepts PRO
STUN GRENADE accepts STU
BOOMBOX accepts BOO
TZP-INHALANT accepts TZP
ZAP GUN accepts ZAP
JETPACK accepts JET
EXTENSION LADDER accepts EXT
LOUD HORN accepts LOU
TELEPORTER accepts TEL
RADAR BOOSTER accepts RAD
You need to type at least 3 characters for it to be accepted.
An overview of the Terminal.
Exploring the Building
At the moment, the layout for each moon doesn’t change so the position of the ship, the entrances to the building and everything stays the same. There are usually two entrances for each building, the main entrance and a fire exit as a secondary exit. March has multiple fire exits.
The layout inside the facility differs slightly every time you visit it. The best thing to do is probably first go in the early hours of the day and make a quick run of the building, exploring any nearby areas for loot and bringing it to the outside of the building. Never leave your loot inside the building as the loot bugs may take it away and you will have to fight them and take it back from their nest then. Although, they introduced Baboon Hawks recently and they may come for your loot but hopefully they should spawn in the afternoon or later so it shouldn’t be a problem.
Afterwards, once you start properly exploring the building make sure to have someone in the ship to guide you and inform you of any nearby monsters. They will also be required to disable any turrets and open/close any doors. Remember that you can also close a door to lock a potential threat inside.
Usually you may come across the reactor in the building as well which would be connected to the building. Despite being a valuable amount (80 credits), I would suggest leaving this as the last item to take and not pull it out early on in the day.
Removing the reactor increases the radiation level in the building and what this means is that there would be no power in the building due to the reactor being removed and the radar inside the ship would also experience distortion with the map being hard to understand in some areas, all the secured doors will be opened and can not be closed. You can take it when you are done exploring the building and it’s time to leave then you can pull it out and bring it back to the ship for extra cash.
Equipment
Below is an in depth reference of all the equipment in the game. There's some information missing for now, so this section will be updated frequently.

Walkie-Talkie
Cost - 12
Weight - 0 lb
Battery life - ~13.5 mins
A Two-way communication device. Requires at least two walkie-talkies to be operable. The batteries should last long enough for the day however, make sure you recharge them before starting off the next day.
I am not sure if the voices can be heard by creatures as players can not hear others radios, this requires some testing to be done. Turning on or off the walkie-talkie makes a sound but does not trigger monsters like Eyeless Dogs. It is best to still turn off the radio when close to the blind dogs just incase.
Flashlight
Cost - 15
Weight - 0 lb
Battery life: 2mins 20secs
A basic flashlight to help you guide through the darkness. It has average brightness with an effective range of 7 meters and a maximum range of 12m. It gets the job done and can easily light up a small room and can help you in spotting fall hazards or dangers nearby.
Caution: Turning the flashlight on or off makes a sound and can trigger creatures nearby. Effects like fog, steam and blizzards obscures the light.

Shovel
Cost - 30
Weight - 16 lb
Melee tool that's able to kill smaller creatures like Hoarding Bugs, Snare Fleas and temporarily disrupt turrets into frenzy mode (Warning: don’t try this at work). Hold click to prepare a hit. One hit is enough to put a teammate in red condition. Two hits for critical condition. The damage varies on how long you hold the attack until its charged fully.
Weed Killer
Cost - 40
Weight - 0 lb
The weed killer can be used to destroy Vain Shrouds to prevent the spawn of the Kidnapper Fox to reduce its aggression area. It can also be used to repair the company cruiser or to give it a boost, both can be done by opening the hood of the cruiser and spraying the engine.
Lockpicker
Cost - 20
Weight - 16 lb
A lock-picking device to open locked doors. Just place it on a door and it will automatically unlock the door for you after 30 seconds. It is pretty slow as compared to just opening it with a key however, it has infinite uses.
Pro-Flashlight
Cost - 25
Weight - 5 lb
Battery life: 5 mins
A much better flashlight as it has a higher brightness and a longer range. It lights up a much wider area and lasts twice the duration as a normal flashlight.
Caution: Turning the pro-flashlight on or off makes a sound and can trigger creatures nearby. Effects like fog, steam and blizzards obscures the light.
Survival Kit
Cost - 138
The survival kit is a bundle of items that you can purchase and doesn’t show up on the store. The survival kit that includes 4 flashlights, 4 walkie-talkies and a shovel. A good kit to start the game after meeting the first quota, it costs the same as buying each item individually but it can be faster to just order the kit instead. I am not sure if you can even purchase this yet as I was not able to confirm the order and could only type deny.

Stun Grenade
Cost - 30
Weight - 5 lb
A non-lethal explosive that stuns most creatures and players for 5 seconds. Click once to pull the pin, click again to toss the grenade. Keep in mind that once the pin is pulled, you have 3 seconds to throw it before it detonates in your hands and leaves you in critical condition. The grenade can fall through rooms with grates so be careful.
Once the grenade has detonated, the empty grenade can still be picked up so you can throw them at mines to blow them up.
There are some enemies that are affected differently by the stun grenade:
Circuit Bees - No effect.
Coil-Heads - No effect.
Giant Worm - No effect.
Girl in a Dress - No effect.
Hygrodere - No effect.
Boombox
Cost - 60
Weight - 16 lb
Battery life: 5mins 40secs
A classic boombox that plays loud music. It can be used to guide your team if they are lost or a much better use would be to lure the Eyeless Dogs away from the ship. Turning it on and off will cycle through the songs.
TZP-Inhalant
Cost - 120
Weight - 0 lb
Total Capacity: 22 seconds
A consumable that decreases your stamina depletion rate and increases your carrying strength, movement speed and raises your voice's pitch. It will take 1 second to activate the inhalant and the buff will vary depending on how long you use the inhalant for:
The inhalant takes effect after 1+4 seconds of use. You'll be mildly impaired with a buff duration of 6 seconds and the debuff lasting 12 seconds..
The heavier effect will hit after 1+8 seconds of use. You'll be impaired and have minor slippery controls, the buff duration is 24 seconds but the debuff will last for 36 seconds.
The overdose effect will hit after 1+12 seconds of use. You'll be greatly impaired with screen distortion, slippery controls for 42 seconds and a buff duration of 36 seconds.
Zap-Gun
Cost - 400
Weight - 11 lb
Battery - Varies
A non-lethal stun gun that temporarily immobilizes any creature or player as long as the electrical arc remains controlled, however it does no damage.
A missed shot uses 10% of its battery meanwhile a hit uses up 20% of the battery. In order to control the zap gun you need to press LMB to scan and lock on-to the target, it usually locks onto the closest target so make sure your teammates aren’t close to you and then keep holding the LMB to keep zapping the target. Once it starts zapping an enemy you need to control the arc by moving the mouse side to side.
Jet-pack
Cost - 900
Weight - 52 lb
Battery - Depends on usage
The jet-pack isn’t really a useful item at the moment. It can be used to thrust you upwards and then move in a certain direction however, it is pretty hard to control and there aren’t that many areas where a jet-pack would be helpful for in the current game. Also, you can not pick up any heavy objects with it. If you keep using it for too long then it will explode and can not be used afterwards.
Caution: Overusing the Jet-pack will cause it to explode. Be mindful of the fall damage.
Extension Ladder
Cost - 60
Weight - 0
A box containing a portable ladder for creating a makeshift bridge. Using this will deploy a ladder vertically and then fall forward until it hits something. The ladder will retract back into its box after 18 seconds so make sure to not stand on it for too long. It can also be anchored at an angle if needed.
Caution: The ladder can kill a teammate if it falls on them so make sure there’s no one under the ladder.
Radar Booster
Cost - 60
Weight - 19 lb
A portable radar beacon that you can deploy anywhere. The booster shows up in the radar and can be pinged from in the terminal, when it’s pinged it will emit a noise followed by a voice. It doesn’t need to be charged as well. The radar booster would have a name when its displayed and shows up on the radar as well, you can ping it by typing “ping” followed by the name of the radar beacon eg if the radar booster shows up as Bobbie on the radar then just type “ping Bobbie” and it will play a sound followed up with a Hello.
Apart from the ping, a flash command was added later on. If you type in flash along with its name then it will act as a stun grenade and flash nearby entities, this means that it will concuss enemies such as Coil-head, Hydrogere and the Forest Keeper.
Spray Paint
Cost - 50
Duration - 30 seconds
A can of spray paint that can be used to mark rooms or areas. It can be helpful if you are venturing deep into the facility as you can leave a trail to remember your way back to the exit. You can also spray onto players to distinguish them from Masked.
Company Cruiser
Cost - 400
The first vehicle that is available in the game, it can be used to drive the crew and any loot around. The cruiser can also be used to crush most outside entities however, they can still damage the cruiser and if it’s destroyed then it will actually damage anyone nearby. It can also be hard to control at first so make sure to test driving it first in an open area before ordering it in moons with variable terrain.
Once bought, there will be a magnet at the side of the ship which can be turned on/off. The magnet can be used to attach the cruiser to the ship for transport across other moons and expeditions.
Lootable Equipment
You can not buy these equipment but, it can be found when scavenging to aid you in your exploration:
Laser Pointer
Weight - 0 lb
Battery life: 2mins 20secs
A red-dot laser pointer. It has an estimated effective range of 25m. Impractical use for navigation as it doesn’t provide any light but, it can be used to check for fall hazards.
Caution: Turning the laser pointer on or off makes a sound and can trigger creatures nearby.
Stop Sign
Weight - 24 lb
Melee tool that acts the same as a shovel. It can kill smaller creatures like Hoarding Bugs, Snare Fleas and temporarily disrupt turrets into frenzy mode. Hold click to prepare a hit. The longer you hold it the more damage it deals. One hit is enough to put a teammate in Red Condition, 3 full hits would kill a teammate but, just pressing left click would take around 5-6 hits.
Yield Sign
Weight - 42 lb
Similar to the shovel or the stop sign however, it is much heavier.
Kitchen Knife
Weight - 0 lb
An alternative melee weapon to the shovel or stop sign, they are dropped by the butler when they are killed. It has a smaller range than the shovel however, it is significantly faster to attack with and doesn’t require a windup attack
Homemade Flashbang
Weight - 5 lb
A rudimentary stun grenade that can be found as loot. Unlike the stun grenade it can not be thrown and it will just explode instantly, flashing everyone nearby and dealing minor damage to the person holding it.
Shotgun
Weight - 16 lb
A double barrel shotgun that can be found by looting a nutcracker. It will always drop the shotgun when killed along with 2 shotgun shells. The shotgun can easily kill most creatures in 1-2 shots (assuming they can be killed).
The shotgun also has the safety trigger on it, it is advised to turn the safety on when there are no threats around as it can sometimes go off in certain situations:
Dropping the shotgun.
Walking over a shotgun on the ground.
Taking damage when the shotgun is in your hands.
Random chance when the shotgun is on the ground or stored somewhere.
Remote
Weight - 0
A remote that can be used to remotely turn off or on the ship's light from any range. Can be used to scare a friend who just started playing and is alone in the ship.
Key
Weight - 0 lb
A key that opens locked doors instantly. Single use and is destroyed once it is used.
Monsters
There are numerous monsters in the game with each having their own unique characteristics. Some creatures are much rarer than others or only appear in the higher tier moons.
I have also noticed that the monsters either have a HP range for each run or the shovel/stop sign does varying damage as some tests have noticed that each monster takes a different amount of hits to kill every time. There are a few monsters that can not be killed right now like the Hydrogere or the Coil Head.
Usually most monsters can spawn from the vents so be careful if you see any open vents as there may be a creature nearby.
I have already done a whole guide on all the monsters found in Lethal Company and their interactions. You can take a look at that guide to know more about each monster.
Read More: Lethal Company: Monsters & Bestiary Guide
An unopen vent.
Loot
There is numerous loot items that you can find on each moon. Scrap can either be one handed item which can be stored in your inventory or two handed items which would be heavier, prevent you from using any items or the ladders but are worth much more. Each moon has different items that can spawn, higher tier moons usually contain more valuable loot or have a higher chance of them spawning.
Loot usually shows up as yellow blips on the radar however, keep in mind that this also includes scrap that may be in the hoarding bugs’ nest or the beehive so make sure to avoid those unless you want to take the risk.
The value for each scrap varies either it is randomly generated from a range of values each time and it may also depend on what tier moon you are visiting, this needs to be tested though.
One-Handed Loot
|
Item |
Value |
Weight |
Notes |
|
Air Horn |
52 - 72 |
0 lb |
Equip-able item, makes loud noises. |
|
Big Bolt |
20 - 32 |
19 lb |
|
|
Brass Bell |
48 - 80 |
24 lb |
|
|
Candy |
6 - 36 |
11 lb |
|
|
Clown Horn |
52 - 72 |
0 lb |
Equip-able item, makes noises. |
|
Coffee Mug |
24 - 68 |
5 lb |
|
|
Cookie Mold Pan |
12 - 40 |
16 lb |
|
|
Dramatic Mask |
40 - 90 |
11 lb |
You will be possessed if you wear it or die with it. |
|
Dust Pan |
12 - 32 |
0 lb |
|
|
Egg Beater |
12 - 44 |
11 lb |
|
|
Gold Bar |
102 - 210 |
77 lb |
|
|
Golden Cup |
40 - 80 |
16 lb |
|
|
Hair Brush |
8 - 36 |
11 lb |
|
|
Hair Drier |
60 - 100 |
7 lb |
Makes noise when used. Limited uses. |
|
Home-made Flashbang |
10 - 28 |
5 lb |
Can be used as a stun grenade. |
|
Jar of Pickles |
32 - 60 |
16 lb |
|
|
Laser Pointer |
32 - 100 |
0 lb |
Equipable item, emits a small laser. |
|
Magic 7 ball |
36 - 72 |
16 lb |
|
|
Magnifying Glass |
44 - 60 |
11 lb |
|
|
Old Phone |
48 - 68 |
5 lb |
This item will make a noise whenever it is equipped. |
|
Perfume Bottle |
48 - 108 |
0 lb |
|
|
Pill Bottle |
16 - 40 |
0 lb |
|
|
Plastic Fish |
20 - 40 |
0 lb |
|
|
Red Soda |
18 - 90 |
7 lb |
|
|
Robot Toy |
56 - 88 |
21 lb |
This item makes loud noises constantly. |
|
Rubber Duckie |
2 - 100 |
0 lb |
|
|
Shotgun |
60 |
16 lb |
Can be used a ranged weapon. |
|
Steering Wheel |
16 - 32 |
15 lb |
|
|
Stop Sign |
20 - 52 |
24 lb |
Improvised melee tool that acts like a shovel |
|
Tattered Metal Sheet |
10 - 22 |
26 lb |
|
|
Tea Kettle |
32 - 56 |
21 lb |
|
|
Teeth |
60 - 84 |
0 lb |
This item will make noises constantly. |
|
Toothpaste |
14 - 48 |
0 lb |
|
|
Toy Cube |
24 - 45 |
5 lb |
|
|
Wedding Ring |
52 - 80 |
16 lb |
|
|
Whoopie Cushion |
6 - 36 |
0 lb |
|
|
Yield Sign |
18 - 36 |
42 lb |
Improvised melee tool that acts like a shovel |
Two-Handed Loot
|
Item |
Value |
Weight |
Notes |
|
Apparatus |
80 |
31 lb |
Picking up this item will shutdown all facility power and causes |
|
Bee Hive |
50 - 156 |
0 lb |
Circuit Bees will attack you if you're near it and can reclaim it, |
|
Bottles |
44 - 56 |
19 lb |
|
|
Cash Register |
80 - 160 |
84 lb |
|
|
Chemical Jug |
32 - 84 |
32 Lb |
|
|
Fancy Lamp |
60 - 128 |
21 lb |
|
|
Large Axle |
36 - 56 |
16 lb |
|
|
Painting |
60 - 124 |
32 lb |
|
|
V-type engine |
20 - 56 |
16 lb |
Tips
Buy at least 2 walkie-talkies, a couple of flashlights and a shovel to help you out with the monsters in the beginning.
The walkie-talkies can be optional if no one is staying behind on the ship at the start.
Keep a flashlight for dark corridors to prevent running into any webs, snare fleas or mines.
If you want to save some time during your expeditions then you can go to The Company moon first and buy items there as the drop pod can also arrive there.
Do not go to any moons with weather effects as they are pretty challenging and not worth the risk since they do not provide you with more valuable loot.
You are not safe even when in the ship so make sure to close the door if an enemy is nearby like the Eyeless Dog or Circuit Bees.
The door hydraulics of the ship only last a while before the doors are opened again so keep an eye on it to avoid being eaten by a nearby monster.
The loud horn can be used to distract the eyeless dogs to the front of the ship if they are camping at the ship door.
If you do not have the loud horn then you can order an item and the drop pod will lure the Eyeless Dogs.
The Company buys scrap at various pricing as each day goes by but you risk losing it all if everyone dies.
Even though there are a few hallway jumps that you need to make in some buildings, the monsters can jump across as well so you are not safe on the other side.
Some monsters can hear you so make sure to not talk if they’re close-by. Some items make noise when you hold them or use them however, they can not hear the audio coming through your walkie-talkie.
You can not swim so try to not drown in the water or get stuck in quicksand.
You can recover your teammates corpses and sell them for spare change. They can even be teleported to the ship unless they’ve been eaten by the worm.
Recovered corpses reduces the amount that you are fined for the casualties.
The stun grenade can go off if you cook it for too long and it does affect you and your teammates.
I will be frequently updating this guide as I learn more about this game and any new features that they might add. Feel free to comment if you want something else to be added or if some information is missing.