
CS2 Optimization Guide - Graphic Settings, Show FPS And More
Counter-Strike 2 has just been released however, there are still many issues with the game that need to be addressed. From missing features, different console commands to performance issues. I have went ahead and compiled a guide on how to optimize your CS2; from buy binds to graphic settings and more.
Show FPS
Valve had removed the net graph for now and if you want to see your fps then you would need to either use a different command or external tools such as the steam overlay or other third-party softwares that display FPS.
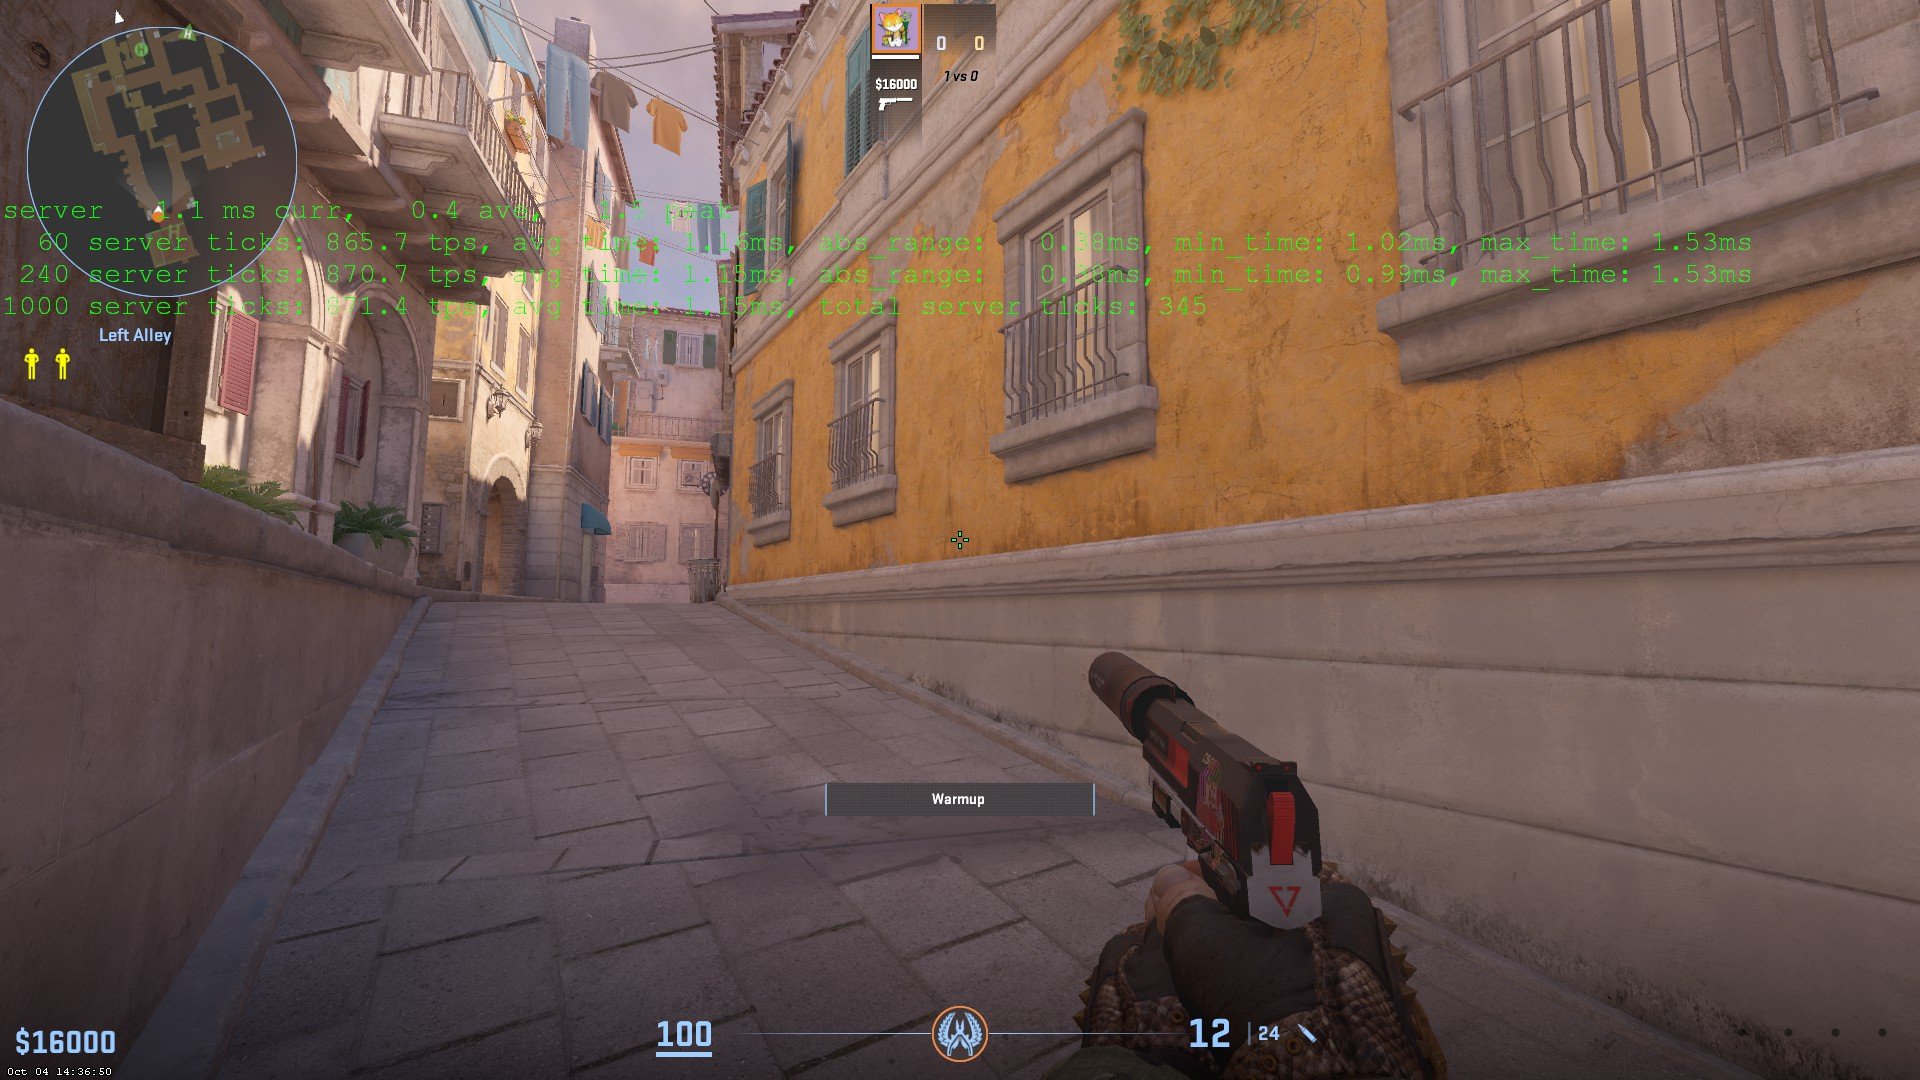
Instead of net_graph, there is the cl_showfps command to display your FPS. This can be set to multiple values to show FPS or the server stats.
cl_showfps 0 - Disables the counter
cl_showfps 1 - Shows the frame rate updated in real-time.
cl_showfps 2 - Shows detailed FPS stats including things such as time taken to render a frame.
cl_showfps 3 - Shows current, average and peak ping
The only downside at the moment is that you can not make the text proportional or move the position of it so that means it would be in the middle of the screen constantly updating and can be distracting sometimes.


Autoexec and other config files location
Since the game is its separate entity it has a different sub-directory inside the CS:GO install path. The autoexec and all your other config files from CS:GO won’t be detected. This can be fixed by copying the config files to the CS2 location.
The cfg files for CS2 need to be moved to the \game\csgo\cfg folder inside the CS:GO install folder (Your previously stored CS:GO config files should be at (\Counter-Strike Global Offensive\csgo\cfg).
However, keep in mind that some commands have either been renamed or removed so some old commands may not work. It’s suggested to not use an autoexec file at the moment.
Net Graph/Telemetry Settings
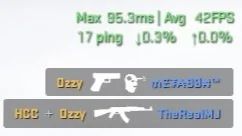
Update: Valve has finally added new telemetry commands in the 15/02/2024 update which provide a much more user-friendly net graph. You can enable telemetry settings in the game settings or by using the following commands:
cl_hud_telemetry_frametime_show - Shows FPS
cl_hud_telemetry_ping_show - Shows ping
cl_hud_telemetry_net_misdelivery_show - Shows packet loss
The values can be from 0 to 2.
0 = Off
1 = Only show, if conditions are poor
2 = Always Show
Show Netgraph Only On Scoreboard
I have been using this bind in CS:GO for quite some time now but wasn’t working in CS2 before. The bind allows you to have the net graph to only show up when you open the scoreboard and prevent it from distracting you during the round.
You can use the following commands to have the net graph only appear with the scoreboard.
alias "+net" "+showscores; cl_hud_telemetry_frametime_show 2; cl_hud_telemetry_ping_show 2; cl_hud_telemetry_net_misdelivery_show 2"
alias "-net" "-showscores; cl_hud_telemetry_frametime_show 0; cl_hud_telemetry_ping_show 0; cl_hud_telemetry_net_misdelivery_show 0"
bind "TAB" "+net"
Make sure to replace TAB with another key if you are using a different key for the scoreboard or if you have a different keyboard layout.
High Packet Loss/Jitters
Ever since the Armory update, some users have noticed that there’s a lot of packet loss or jitters while playing. One possible solution is to switch the “Buffering to smooth over packet loss” setting to 1 packet instead of 0. The setting can be found in the “Game” tab of the settings right under the max matchmaking ping settings. It may improve the overall experience when facing packet loss however, if it worsens the gameplay then make sure to just revert the changes.

Left-Handed Model
After waiting for months and continuous requests by the community, Valve has finally added the left-handed model to CS2. By default, you can press H on your keyboard (US-layout) to swap your model preference. Keep in mind that it is not an instant change any more and every time you change it, your model will actually play the animation of drawing the currently equipped weapon out again.
You can also manually change it in console by using the “switchhands” command to switch from right to left hand and vice versa.
At the moment there’s a bug which doesn’t allow the molotov to show on the left-hand side, hopefully this will be fixed soon.
Left-handed model.
In-game Graphic Settings
You can tweak your graphic settings in order to achieve the most FPS however, some settings can be beneficial such as the shadows and particle settings to make it easier to spot enemies. Keep in mind that Valve has been constantly optimizing the game and people have noticed the increase in performance over the months. You can use the following optimal settings for now:
Video Settings:
Brightness: 100%
Display Mode: Fullscreen (Use fullscreen at the moment for the most FPS, Fullscreen windowed doesn’t allow you to adjust your brightness)
Laptop power savings: Disabled
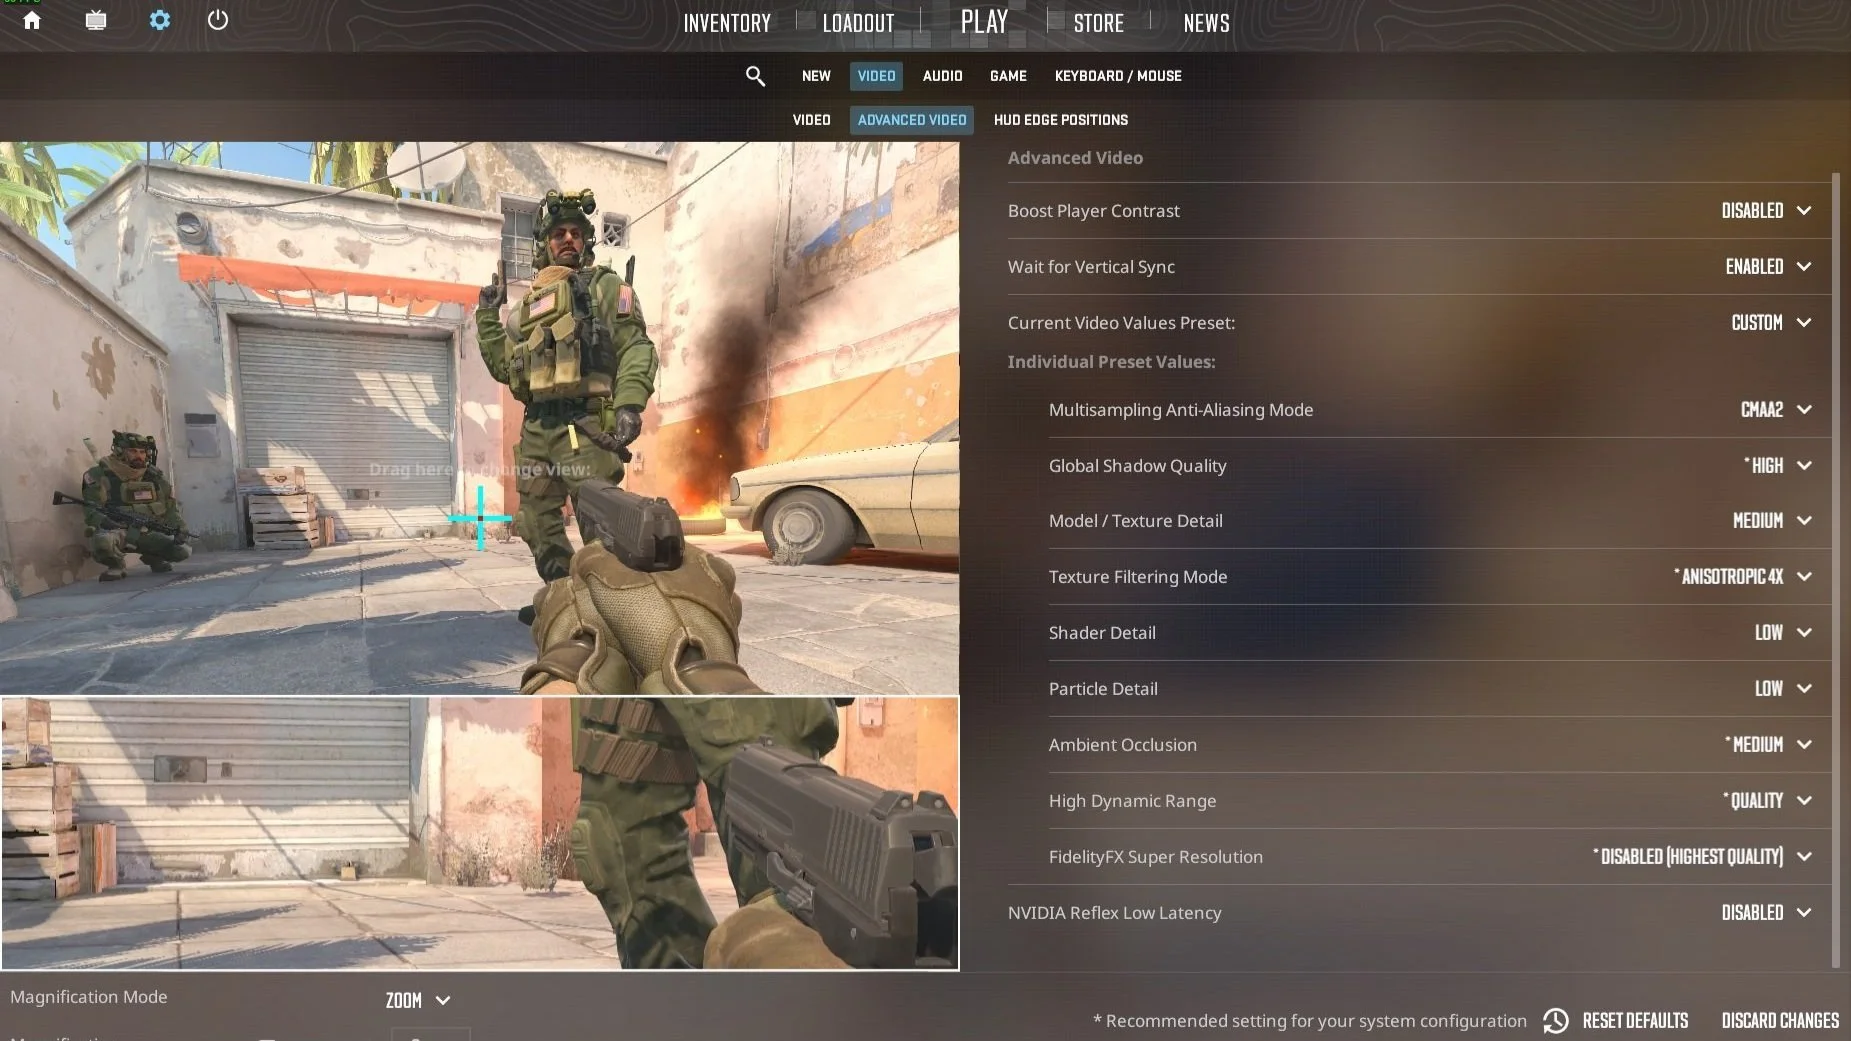
Advanced Video Settings:
These video settings reflect the best settings you need in terms of having a gameplay advantage and the most amount of FPS.
Boost Players Contrast: Enabled (You can disable this if your game is stuttering)
Wait for Vertical Sync: Disabled
Current Video Values Preset: Custom
Multisampling Anti-Aliasing Mode: CMAA2 (Anti-Aliasing is the most demanding setting, you can increase this if you have a good PC)
Global Shadow Quality: High (The long shadows are not generated in Medium or Low settings so its beneficial to keep it on High at least)
Dynamic Shadows: All
Model/Texture Detail: Medium
Texture Filtering Mode: Anistropic 4x
Shader Detail: Low
Particle Detail: Low
Ambient Occlusion: Medium (It casts the player shadows if they are near a wall so it should be enabled)
High Dynamic Range: Quality
FidelityFX Super Resolution: Disabled (Highest Quality)
NVIDIA Reflex Low Latency: Depends on your system (Enabled in most cases)
Note: I have enabled Vertical Sync (Vsync) as I was experiencing screen tearing in CS2.
The MSAA settings has been affecting the FPS the most so you can keep it on CMAA2 or Off but it will make the game look much worse. It may cause stutters as well on higher settings, you can move it up to 2x or 4x MSAA if your PC allows you to.
I have put the Global Shadow Quality to High because shadows play a huge factor in CS2 and they do not appear in lower settings so its better to keep it on high.
The Model/Texture detail barely has an impact on FPS so you can turn up that to Medium to High to make your skins look better.
Particle and Shader Detail settings are mostly visual and can be turned down Low in order to increase FPS slightly.
Turn Ambient Occlusion to either Medium or High as it casts the shadow on walls if a player is close to a wall or an object.
I would prefer High Dynamic Range (HDR) at Quality as it does not impact FPS that much and at Performance the game can have weird effects in certain areas which can be distracting.
I would highly suggest keeping FidelityFX disabled, changing the settings can help improve your FPS slightly but the game would look really bad as the graphics would be smudged.
Valve recently added the Texture Filtering Mode to Counter-Strike 2. It doesn’t have much of a FPS impact so you can keep it to Anistropic 4x or even 8x or 16x if you have a good PC. They can also improve the visuals of your skins.
NVIDIA Reflex can be turned on either in-game or from the Nvidia settings (in-game overrides Nvidia Control Panel). NVIDIA Reflex highly depends on your system and may give you an increase in FPS in most situations however, some people may experience input lag or reduced FPS.
Keypad binds
This is for some of the people who are like me that are still out there who have 100% keyboards and actually use the Numpad for binds, most likely the buy binds. The keys for the binds have been updated. Previously it used the function of the keypad so the keys were called like “KP_PGDN” or “KP_END” etc. Now it has been updated to reflect the number instead so you just need to update the binds and make sure they are working again so KP_END is KP_1 and so on.
Eg.
Old: bind KP_PGUP "buy vest"
New: bind KP_9 "buy vest"
Buy Binds
Previously, the weapon buy binds were broken however, the 10/4/2023 update has fixed the buy binds and now they worked as they used to before however, if you do not have that weapon equipped then it will not work. You can still bind keys to buy by slot.
They work as they used to before so bind KP_3 "buy ak47" will get you the AK-47 when you press 3 on the numpad however, you will not get its equivalent in CS2 so you would have to tweak it to include both CT and T side weapons like bind KP_3 "buy ak47;buy m4a1_silencer". This applies to other weapons as well such as the AUG/SG, Scar-20/G3SG1 etc. The only exception is the molotov/incendiary grenade as you will get it’s respective sides’ grenade even if you only have one grenade binded to a key.
You can take a look at the names for the weapon names below:
| Weapon Name | Code | Weapon Name | Code |
| Secondary / Pistols | Utility | ||
| USP-S | usp_silencer | Zeus | taser |
| Glock-18 | glock | Decoy Grenade | decoy |
| Dual Berettas | elite | Flashbang | flashbang |
| Five-SeveN | fiveseven | High Explosive Grenade | hegrenade |
| P2000 | hkp2000 | Incendiary Grenade | incgrenade |
| P250 | p250 | Molotov | molotov |
| R8 Revolver | revolver | Smoke Grenade | smokegrenade |
| Tec-9 | tec9 | Defuse Kit | defuser |
| CZ75-Auto | cz75a | Kevlar | vest |
| Desert Eagle | deagle | Kevlar + Helmet | vesthelm |
| Mid Tier | Rifles | ||
| MAG-7 | mag7 | AK-47 | ak47 |
| Nova | nova | AUG | aug |
| Sawed-off | sawedoff | AWP | awp |
| XM1014 | xm1014 | FAMAS | famas |
| M249 | m249 | G3SG1 | g3sg1 |
| Negev | negev | Galil AR | galilar |
| PP-Bizon | bizon | M4A4 | m4a1 |
| MAC-10 | mac10 | M4A1-S | m4a1_silencer |
| MP5-SD | mp5sd | SCAR-20 | scar20 |
| MP7 | mp7 | SG 553 | sg556 |
| MP9 | mp9 | SSG 08 | ssg08 |
| P90 | p90 | ||
| UMP-45 | ump45 | ||
Buy Binds using loadout slots
You can still buy using the weapons slots by binding a key their respective slot (0 is the first top slot, 1 is the second slot from the top and so on with 4 being the last slot):
“buy secondary0-4” for pistol/secondary weapons
“buy midtier0-midtier4” for Mid-tier weapons.
“buy rifle0-4” for the rifles.
Performance issues
Most people have noticed that they have had performance issues. Considering how the game is on a new engine it is obvious to have some change in the performance however, some of the players are experiencing frame drop and FPS issues despite having good systems.
It’s suggested to use Fullscreen mode instead of windowed borderless and ticking “Disable full screen optimizations” for the CS2 executable (CS2.exe in Steam Games\steamapps\common\Counter-Strike Global Offensive\game\bin\win64 directory) can help with performance.
In order to disable full screen optimization you would need to find the CS2 executable, right click the CS2.exe and in property, go to the compatibility section and tick the “Disable full-screen optimizations” option.

Gamma Settings
One thing that players notice when looking at the game is that it’s much brighter than the previous game. This is caused by brightness being defaulted to 110% whenever you launch the game and the gamma as well. The gamma can be reduced or increased in order to suit your needs using the r_fullscreen_gamma command.
The default value is 2.2 however you can increase it to make the game darker or reduce it to brighten it. Also, you need to be playing on fullscreen in order for the changes to take effect as the values will not do anything if you’re on windowed borderless.
Default value: r_fullscreen_gamma 2.2
Reduce brightness: r_fullscreen_gamma 2.6 or 2.4
Increase brightness: r_fullscreen_gamma 1.8 or 2
There are still numerous issues that Valve would probably be looking into and fixing them as time passes by. I will be updating this guide every now and then.
Other Articles: